Is your trusty office chair showing its age, with worn fabric, flattened cushions, and an overall tired appearance? Don’t relegate it to the landfill just yet! A worn-out office chair can detract from your workspace aesthetics and even impact your productivity and comfort. Fortunately, reupholstering an old office chair yourself is a rewarding, cost-effective, and surprisingly achievable DIY project that can breathe new life into your beloved seat. This comprehensive guide will walk you through every step, transforming your old chair into a refreshed and personalized masterpiece, suitable for any home or professional office.
1. Why Reupholster Your Office Chair? Beyond Just Looks
Beyond simply improving its appearance, giving your office chair a new lease of life through reupholstery offers several compelling advantages that make it a worthwhile endeavor. It’s an investment in your comfort, your wallet, and even the planet.
1.1. Benefits of Reupholstery
Reupholstering your office chair delivers a range of tangible benefits, far surpassing a quick aesthetic fix. The process allows for significant improvements both functionally and visually.
- Cost-Effectiveness: Purchasing a brand-new, high-quality office chair can be a substantial expense. Reupholstering often costs a fraction of the price of a new chair, especially if the frame and mechanical components are still in good working order.
- Customization & Personalization: This is your chance to infuse your personality into your workspace. Choose a fabric that perfectly matches your office decor, personal style, or even your brand’s colors, creating a unique piece that store-bought chairs can’t offer.
- Sustainability & Upcycling: By choosing to reupholster, you’re actively participating in sustainable practices. You prevent a perfectly functional chair from ending up in a landfill, contributing to waste reduction and giving an existing item a second life.
- Enhanced Comfort & Ergonomics: Over time, chair cushions flatten and lose their support. Reupholstering provides the ideal opportunity to replace old, worn-out foam with new, high-density cushioning, improving posture, reducing pressure points, and enhancing overall comfort during long working hours.
|
Our Picks for the Best Ergonomic Chair in 2026
As an Amazon Associate I earn from qualifying purchases.
|
||
| Num | Product | Action |
|---|---|---|
| 1 | Sweetcrispy Office Computer Desk Chair, Ergonomic High-Back Mesh Rolling Work Chairs with Wheels and Adjustable Headrests, Comfortable Lumbar Support, Comfy Flip-up Arms for Home, Bedroom, Study,Black |

|
| 2 | Marsail Ergonomic Office Chair Ergonomic Gaming Chair with Lumbar Support, 2D Headrest, Adjustable Armrests, Contoured Seat Cushion, Computer Desk Chair with Wheels for Home and Office |
|
| 3 | TRALT Office Chair - Ergonomic Desk Chair with Adjustable Lumbar Support, Mesh Computer Chair, Executive Chairs for Home Office Comfortable Lumbar Support (Black) |
|
| 4 | Fizzin Ergonomic Office Chair, 400 LBS Computer Chairs with Adjustable Lumbar Support, Breathable Mesh Desk Chair Ergonomic with Thickened Cushion, Comfy Home Office Desk Chair (Black) |
|
| 5 | PatioMage Ergonomic Office Chair, Big and Tall Desk Chair with Adjustable Lumbar Support & Seat Depth, High Back Computer Chair, Swivel Mesh Chairs with Wheels for Home Office, Black |
|
| 6 | Ergonomic Office Chair with Footrest - Adjustable Lumbar Support & Headrest, 90-160° Reclining Mesh Back Computer Chair - Home Office/Gaming, 350lbs Capacity (SGS Certified) |
|
| 7 | Ergonomic Office Chair, Mesh Seat Cushion with 3D Armrests and 3D Headrest, Adjustable Lumbar Support with 90-120° Rocking Function, SGS Class 4 Gas Clylinder, Black |
|
| 8 | TRALT Office Chair Ergonomic Desk Chair, 330 LBS Home Mesh Office Desk Chairs with Wheels, Comfortable Gaming Chair, High Back Office Chair for Long Hours (Black) |
|
| 9 | Ergonomic Office Chair with Footrest - Adjustable Lumbar Support & Headrest, 90-160° Reclining Mesh Back Computer Chair - Home Office/Gaming, 350lbs Capacity (SGS Certified) |
|
| 10 | Marsail Ergonomic Office Chair: Office Desk Chair with High Back Mesh and Adjustable Lumbar Support Rolling Work Swivel Task Chairs with Wheel 3D Armrests and Headrest |
|
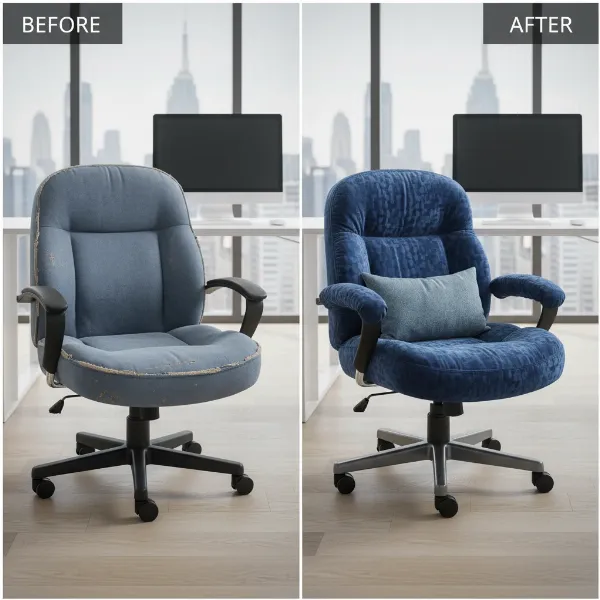 Before and after comparison of an office chair, highlighting the benefits of reupholstery.
2. Gathering Your Arsenal: Tools and Materials
Before you dive into the transformation, ensure you have all the necessary tools and materials readily available. Having everything organized beforehand will make the process smoother and more efficient.
2.1. Essential Tools
A successful DIY reupholstery project hinges on having the right equipment. Most of these tools are common household items or easily accessible at a hardware store.
- Screwdriver Set (Phillips and Flathead): Essential for disassembling the chair, including removing the seat, backrest, and armrests.
- Staple Gun & Staples: A heavy-duty staple gun (manual, electric, or pneumatic) is crucial for securing the new fabric. Choose staples appropriate for upholstery, typically 1/4 to 1/2 inch in length. An electric staple gun can significantly reduce hand fatigue during the stapling process.
- Staple Remover / Flat Screwdriver: Indispensable for prying out hundreds of old staples. A dedicated upholstery staple remover is highly recommended for efficiency and to save your fingers.
- Sharp Scissors / Fabric Shears: For precise cutting of your new upholstery fabric. Dull scissors will lead to jagged edges and frustration.
- Pliers (Needle-Nose): Useful for pulling out stubborn staples or adjusting small pieces of fabric.
- (Optional) Utility Knife: Can be helpful for cutting thicker foam or tough old fabric.
- (Optional) Sandpaper & Spray Paint: If you plan to refresh the chair’s plastic or metal components.
- (Optional) Hot Glue Gun: Can be used for temporarily securing fabric edges or tricky areas before stapling, especially helpful if working alone.
2.2. Selecting Your Materials
The quality and type of your chosen materials will directly impact the look, feel, and durability of your newly upholstered chair. Choose wisely to ensure a lasting result.
- Upholstery Fabric: The star of your project! Measure the dimensions of your chair’s seat, back, and any other areas to be covered. It’s always best to purchase a little extra (e.g., an additional 1-2 yards) to account for pattern matching, mistakes, or future repairs. Consider durability, cleanability, and aesthetic appeal, as discussed in Section 4.
- High-Density Foam: If your old cushion is flattened or uncomfortable, new foam is a must. Measure the existing foam’s dimensions and thickness. High-density foam (e.g., 2-inch thick Airtex foam) provides excellent support and longevity. You might also consider a layer of polyester batting over the foam for extra softness and to smooth out any imperfections.
- (Optional) Cording/Piping: For chairs with intricate details or a more professional finish, cording can be added along seams.
- (Optional) Dust Cover Fabric: A thin, non-woven fabric can be stapled to the underside of the seat to give a clean finish and protect the foam from dust.
3. Deconstruction to Reconstruction: Step-by-Step Reupholstery
With your tools and materials ready, it’s time to embark on the transformation. This step-by-step guide will help you navigate the process, from carefully taking your chair apart to stapling the final piece of fabric.
3.1. Disassembly: Taking Your Chair Apart
The first crucial step is to carefully dismantle your office chair into its individual components. This allows for easier access to the parts that need reupholstering.
Key Action: Start by unscrewing the base, armrests, and separating the seat and backrest cushions from the chair’s frame. It’s vital to document this process thoroughly by taking photos or notes at each stage. This will serve as your invaluable reference when it comes time for reassembly. Keep all screws and small parts organized in a container to avoid losing them. Many office chairs have plastic coverings on the back or bottom cushions; these often pop off to reveal hidden screws.
3.2. Stripping Away the Old
Once the components are separated, you’ll need to remove the old fabric. This can be the most time-consuming part, but patience here will set you up for success.
Key Action: Use your staple remover or a flat screwdriver to carefully pry out all the old staples holding the fabric in place. Work methodically to avoid damaging the underlying frame or foam. If your existing foam is still in good shape and you wish to keep it, be extra gentle. However, if the foam is flattened, crumbling, or severely worn, this is the perfect opportunity to remove it and replace it with new, supportive high-density foam.
3.3. Preparing Your New Fabric and Foam
Accurate cutting of your new materials is essential for a clean, professional finish. Take your time to measure and cut precisely.
Key Action: If you are replacing the foam, use the old foam or the seat/backrest base as a template to measure and trim your new high-density foam to match. For the fabric, lay your new upholstery fabric flat, pattern side down. Place the old fabric (or the chair component) on top, ensuring you have ample material to wrap around to the underside for stapling—typically an extra 2-4 inches on all sides. Use the old fabric as a template to cut your new pieces. If your fabric has a directional pattern, ensure all pieces are cut with the pattern running in the same direction for a cohesive look. Ironing your new fabric before cutting can help eliminate creases for a smoother finish.
3.4. Reupholstering the Seat
The seat cushion is often the most straightforward part to reupholster. This method focuses on a no-sew approach for most standard office chair seats.
Key Action: Center your new foam (if using) on the seat base, then center your new fabric over the foam, right side up. Flip the seat upside down, so the fabric is right side down. Start by placing one staple in the center of one side, pulling the fabric taut. Place another staple directly opposite on the center of the other side. Repeat for the remaining two sides. Continue stapling outwards from the center on all four sides, consistently pulling the fabric taut to eliminate wrinkles. When you reach the corners, neatly fold the fabric into pleats, smoothing the fabric on the front side, and secure with staples. Trim any excess fabric, ensuring screw holes remain unobstructed for reassembly.
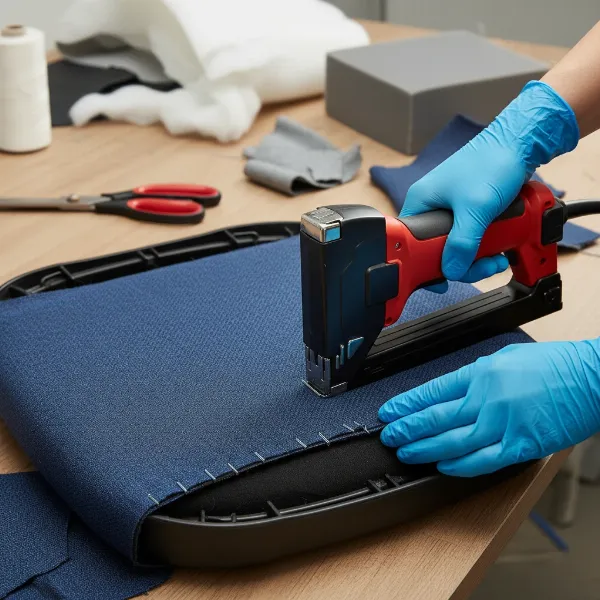 Hands using an electric staple gun to secure new fabric onto an office chair seat.
3.5. Reupholstering the Backrest (and Armrests if applicable)
The backrest may have more curves than the seat, requiring careful handling to achieve a smooth finish. Armrests vary greatly, some may need full upholstery while others only padding.
Key Action: Apply the same method as the seat cushion: center the fabric, start with central staples, and work outwards, consistently pulling the fabric taut. For curved sections on the backrest, make small relief cuts into the excess fabric where it wraps around tight curves. This allows the fabric to lay flatter and prevents bulkiness. Neatly fold and staple the corners and curved edges, striving for a smooth appearance on the visible side. If your armrests are upholstered, carefully remove their old fabric and follow the same stapling technique for a refreshed look. For chairs with plastic backings, you might consider spray painting them while the fabric is being applied to give the entire chair a uniform, renewed appearance.
3.6. Reassembly: Bringing It All Back Together
The final stage is to put your newly upholstered chair back together, referencing your earlier documentation.
Key Action: Carefully reattach the reupholstered seat and backrest to the chair’s frame, using the screws you organized earlier. Refer to your photos or notes from the disassembly phase to ensure each component is correctly positioned and securely fastened. Double-check all connections to ensure stability and safety. If you opted for a dust cover, staple it neatly to the underside of the seat for a clean, finished look.
4. Choosing the Right Fabric: Durability Meets Style
The fabric you select is paramount to the success of your reupholstery project, influencing both the chair’s aesthetics and its long-term performance. It’s crucial to balance visual appeal with practical considerations for an office environment.
4.1. Popular Upholstery Fabric Types
Different fabrics offer varying benefits, catering to diverse needs and styles for an office chair.
- Polyester/Microfiber: Highly durable, stain-resistant, and relatively soft, making it an excellent choice for high-traffic office chairs. It’s easy to clean and comes in a wide array of colors and textures.
- Vinyl/Faux Leather: Provides a professional, sleek appearance and is exceptionally easy to wipe clean, ideal for minimizing allergens and maintaining hygiene. However, it may not be as breathable as fabric, potentially leading to discomfort in warmer environments.
- Twill/Canvas: These robust, tightly woven fabrics are known for their strength and durability. They offer a more casual yet sturdy look and are available in many solid colors and simple patterns.
- Natural Fibers (Cotton, Linen): Offer breathability and a natural aesthetic. While comfortable, they may be more prone to wrinkling, staining, and wear compared to synthetic options, requiring more diligent care.
4.2. Considerations for Office Chair Fabric
When making your selection, think about how the chair will be used daily and the demands placed upon it.
Choosing a fabric for your office chair requires a careful balance of aesthetic desires and practical necessities. Consider its durability for frequent use, ease of cleanability against spills or stains, adequate comfort and breathability for long hours, and its overall aesthetics to complement your workspace.
“The secret to a long-lasting reupholstery project lies not just in the craftsmanship, but in selecting a fabric that truly stands up to the daily grind of office use. Durability and ease of maintenance should be as important as color and pattern.” – Jane Doe, Professional Upholsterer and Furniture Restorer
5. Pro Tips for a Flawless Finish
Even for a DIY project, aiming for a professional look is achievable with a few expert insights and careful execution.
- Patience is Key: Do not rush any step, especially disassembly and stapling. Haste often leads to mistakes that are time-consuming to correct. Take breaks if you feel frustrated.
- Stretch Fabric Evenly: This is critical to avoid wrinkles, puckers, and sags. Consistently pull the fabric taut as you staple, checking the front side frequently to ensure a smooth, even surface.
- Secure Corners Neatly: Corners can be challenging. Practice folding and pleating the fabric tightly and smoothly around curves. Don’t be afraid to remove staples and re-do corners until they look clean and professional.
- Safety First: Always wear eye protection when using a staple gun. Staples can ricochet, posing a risk to your eyes. Consider wearing gloves to protect your hands.
- Seek Assistance: For larger or more complex chairs, an extra pair of hands can be incredibly helpful for stretching fabric tightly while another person staples, ensuring a drum-tight finish. If working alone, temporary clamps or a hot glue gun can assist.
Conclusion
Reupholstering an old office chair is more than just a home improvement project; it’s an act of creativity and sustainability that can profoundly impact your workspace. By following this DIY guide, you can transform a worn, uncomfortable chair into a stylish and supportive piece that perfectly suits your needs and aesthetic. The satisfaction of sitting in a chair you’ve personally revitalized, saving money and reducing waste in the process, is truly unparalleled.
Embrace the challenge, take pride in your craftsmanship, and enjoy the renewed comfort and style your refurbished chair brings to your daily work. What unique fabric will you choose to breathe new life into your old office chair?
Frequently Asked Questions
How much fabric do I need to reupholster an office chair?
Typically, for a standard office chair with a separate seat and backrest, you will need approximately 1 to 2 yards (0.9 to 1.8 meters) of upholstery fabric. It’s always advisable to buy slightly more than your measurements to account for pattern matching, potential errors, and generous wrap-around for stapling.
Can I reupholster an office chair without sewing?
Yes, absolutely! Many standard office chairs with separate seat and back cushions can be reupholstered entirely without sewing. The process primarily involves disassembling the chair, removing old fabric, cutting new fabric, stretching it taut, and securing it with a staple gun.
What’s the best type of staple gun for upholstery?
For DIY upholstery, an electric staple gun is generally recommended as it provides consistent power and reduces hand strain compared to manual versions. Pneumatic staple guns, while powerful, require an air compressor and are usually favored by professionals.
Is it worth reupholstering an old office chair?
Reupholstering an old office chair is definitely worth it if the chair’s frame and mechanical components are still sturdy and functional. It’s a cost-effective way to extend the life of your furniture, customize its appearance, improve comfort with new foam, and practice sustainable living by upcycling.
How long does it take to reupholster an office chair?
The time required can vary significantly based on your experience level and the complexity of the chair. For a relatively simple office chair with separate cushions, the entire process might take anywhere from 3 to 8 hours, with much of that time spent on removing old staples and carefully cutting fabric.